
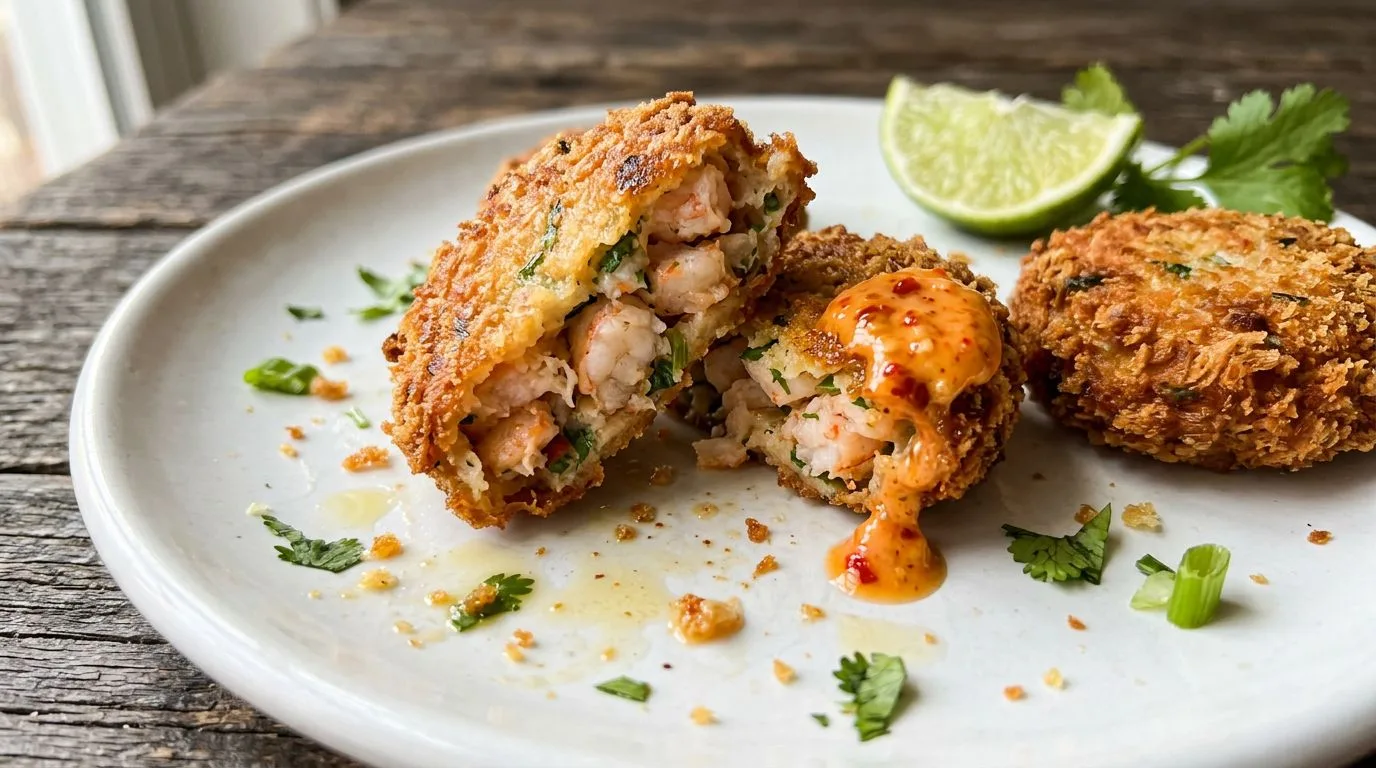
If you’re looking for an appetizer that brings bold Thai flavors to your table with minimal effort, these Thai shrimp cakes are exactly what you need. I love how they combine the sweet, aromatic notes of fresh shrimp with the spicy kick of red curry paste and the brightness of lime and cilantro. Each bite delivers a crispy exterior that gives way to a tender, flavorful interior packed with ginger, garlic, and green onions.
What makes this recipe truly special is the creamy chili aioli that accompanies these golden-brown patties. The combination of mayonnaise, sweet chili sauce, and sriracha creates a sauce that’s both cooling and spicy, perfectly balancing the robust flavors in the shrimp cakes. Whether you’re hosting a dinner party, planning game day snacks, or simply craving restaurant-quality Thai food at home, these shrimp cakes deliver impressive results without requiring advanced cooking skills.
I find that serving these warm from the skillet with fresh lime wedges and that irresistible chili aioli makes them disappear almost instantly. They’re the kind of appetizer that has everyone asking for the recipe, and I’m always happy to share because they’re surprisingly simple to make.
Why You’ll Love This Recipe
These Thai shrimp cakes check all the boxes for an outstanding appetizer. First, they’re incredibly flavorful without being overwhelming. The red curry paste provides authentic Thai heat and complexity, while the fish sauce adds that essential umami depth that makes Thai cuisine so addictive. I love how the fresh herbs and aromatics—cilantro, ginger, garlic, and green onions—brighten every bite.
The texture is another winning feature. By pulsing the shrimp in a food processor rather than mincing them by hand, you get a perfect coarse texture that holds together beautifully while still feeling substantial and satisfying. The panko breadcrumbs add just enough structure to help the patties maintain their shape during cooking, while also contributing to that coveted crispy exterior.
I also appreciate how quickly these come together. From start to finish, you can have these on the table in about 30 minutes, including the brief chilling time that helps them firm up. The chili aioli takes literally two minutes to whisk together, yet it tastes like something you’d get at an upscale Thai restaurant.
Finally, these shrimp cakes are incredibly versatile. They work equally well as an elegant appetizer for a dinner party, a casual snack for watching sports, or even as the protein component of a light lunch when served over greens. The recipe scales easily, so you can make a small batch for a quiet evening or double it for a crowd.
Ingredients and Substitutions
The ingredient list for these Thai shrimp cakes is straightforward, but each component plays an important role in building the final flavor profile. Let me walk you through what you’ll need and where you have flexibility.
For the shrimp cakes: Fresh or previously frozen raw shrimp work equally well, as long as they’re fully thawed and patted dry before processing. I recommend using medium to large shrimp (31-40 count per pound) for the best texture. If you can only find cooked shrimp, the recipe won’t work as well since you need the raw shrimp to bind properly.
Red curry paste is essential for authentic Thai flavor. I find it in the Asian foods aisle of most supermarkets. If you prefer less heat, you can reduce the amount to 1 tablespoon, but don’t skip it entirely or you’ll lose that characteristic Thai taste. Green curry paste can substitute in a pinch, though it will change the flavor profile slightly.
Fish sauce is another non-negotiable ingredient that provides the salty, savory backbone of these cakes. If you absolutely cannot use fish sauce due to dietary restrictions, soy sauce can work as a substitute, though the flavor won’t be quite as complex. Use about 2 teaspoons of soy sauce instead of the full tablespoon of fish sauce.
The fresh ginger and garlic are crucial for aromatic depth. I always use fresh rather than powdered versions for this recipe because the bright, pungent flavors make such a difference. Green onions add a mild onion flavor and beautiful green flecks throughout the cakes. Regular yellow onion, finely minced, can substitute if needed.
Panko breadcrumbs are my preferred choice because they’re lighter and create a better texture than regular breadcrumbs. If you only have regular breadcrumbs, they’ll work, but use slightly less—about 1/4 cup instead of 1/3 cup.
For the chili aioli: The sauce comes together with mayonnaise as the base. I use regular full-fat mayo for the best flavor and texture, but light mayo works if that’s what you have. The sweet chili sauce (sometimes labeled as Thai sweet chili sauce) is widely available and adds both sweetness and mild heat. Sriracha brings additional spice—adjust the amount based on your heat preference.

How to Make This Recipe
Making Thai shrimp cakes is a straightforward process that requires just a few simple steps. I’ll walk you through each one to ensure perfect results.
Step 1: Process the shrimp. Add your peeled and deveined shrimp to a food processor. Pulse the shrimp 8-10 times until they’re coarsely chopped but not pureed. You want a texture that’s somewhere between finely minced and chunky—think of it as a rough chop with some larger pieces still visible. This texture is key to achieving shrimp cakes that hold together while still having a satisfying bite.
Step 2: Mix the shrimp cake ingredients. Transfer the chopped shrimp to a large mixing bowl. Add the red curry paste, chopped green onions, minced garlic, grated ginger, fish sauce, egg, panko breadcrumbs, fresh cilantro, and lime juice. Using your hands or a sturdy spoon, mix everything together until well combined. The mixture should be cohesive but still slightly sticky.
Step 3: Form and chill the patties. Divide the mixture into 10-12 equal portions. With slightly wet hands (this prevents sticking), shape each portion into a patty about 2-3 inches in diameter and roughly 1/2 inch thick. Place the formed patties on a plate or baking sheet lined with parchment paper. Refrigerate for 15 minutes. This chilling step is important—it helps the patties firm up so they hold their shape better during cooking.
Step 4: Cook the shrimp cakes. Heat the vegetable oil in a large skillet over medium heat. Once the oil is shimmering but not smoking, carefully add the shrimp cakes, working in batches if necessary to avoid crowding the pan. Cook for 3-4 minutes on the first side without moving them—this allows a golden crust to form. Flip carefully and cook for another 3-4 minutes on the second side until both sides are golden brown and the internal temperature reaches 145°F (63°C).
Step 5: Make the chili aioli. While the shrimp cakes cook (or beforehand), whisk together the mayonnaise, sweet chili sauce, sriracha, and lime juice in a small bowl until smooth and well combined. Taste and adjust the sriracha if you want more heat.
Step 6: Serve. Transfer the cooked shrimp cakes to a serving platter. Serve them warm with the chili aioli on the side for dipping and fresh lime wedges for squeezing over the top.
Expert Tips for Best Results
After making these shrimp cakes many times, I’ve learned a few tricks that consistently produce the best results. Here’s what I recommend:
Don’t over-process the shrimp. The biggest mistake I see is turning the shrimp into a paste in the food processor. You want a coarse, chunky texture, not a smooth puree. Pulse in short bursts and check frequently. If you don’t have a food processor, you can chop the shrimp by hand with a sharp knife—it just takes a bit more time.
Keep your hands wet when forming patties. The shrimp mixture is naturally sticky, which helps it hold together during cooking but makes it challenging to shape. I keep a small bowl of water nearby and wet my hands before forming each patty. This simple trick prevents sticking and makes the process much smoother.
Don’t skip the chilling time. Those 15 minutes in the refrigerator make a real difference. The patties firm up, making them much easier to flip without breaking apart. If you’re making these ahead, you can refrigerate the formed patties for up to 4 hours before cooking.
Use medium heat and don’t rush. I find that medium heat is the sweet spot for these shrimp cakes. Too high and the outside burns before the inside cooks through; too low and they don’t develop that beautiful golden crust. Be patient and let them cook undisturbed for the full 3-4 minutes per side.
Work in batches if needed. Crowding the pan lowers the temperature and creates steam, which prevents proper browning. I usually cook 4-5 cakes at a time in a 12-inch skillet, leaving space between each one. Keep the first batch warm in a 200°F oven while you cook the rest.
Taste and adjust the aioli. Everyone’s heat tolerance is different. Start with the 1 teaspoon of sriracha in the aioli, then taste it. You can always add more sriracha or even a pinch of cayenne pepper if you want extra kick.
Serving Suggestions
These Thai shrimp cakes are incredibly versatile when it comes to serving options. My favorite way to serve them is as a passed appetizer at parties, arranged on a platter with the chili aioli in a small bowl in the center and lime wedges scattered around the edges. They’re the perfect finger food—substantial enough to be satisfying but not so filling that guests can’t enjoy the rest of the meal.
For a more casual presentation, I like to serve them alongside other Asian-inspired dishes. They pair beautifully with Thai coconut curry chicken soup for a Thai-themed dinner party. The creamy, aromatic soup complements the crispy, spicy shrimp cakes perfectly.
If you’re serving these as a main course rather than an appetizer, I recommend plating 3-4 cakes per person over a bed of mixed greens or jasmine rice. Add some quick-pickled cucumbers, shredded carrots, and fresh herbs like cilantro and mint for a complete meal. A simple cucumber salad with rice vinegar and sesame oil also makes an excellent side dish.
For game day or casual gatherings, set up a DIY shrimp cake station. Arrange the warm cakes on a platter with several dipping sauce options—the chili aioli, of course, but also sweet chili sauce on its own, peanut sauce, or even a simple soy-ginger dipping sauce. Let guests mix and match their preferred combinations.
These also work wonderfully as part of a larger appetizer spread. I’ve served them alongside jalapeño popper dip for parties that blend different flavor profiles, and the combination of Thai and Southwestern flavors is surprisingly harmonious.
Variations and Substitutions
While this recipe is delicious as written, there are several ways you can customize it to suit your preferences or work with what you have on hand.
Protein variations: If shrimp isn’t available or you prefer something different, you can make these cakes with other seafood. Crab meat works beautifully—use lump crab meat and reduce the processing time since it’s already in small pieces. You can also use a combination of shrimp and white fish like cod or halibut for a different texture.
Heat level adjustments: To make these milder, reduce the red curry paste to 1 tablespoon and use only 1/2 teaspoon of sriracha in the aioli. For extra heat, add a minced Thai bird’s eye chili to the shrimp mixture or increase the curry paste to 3 tablespoons.
Herb variations: While cilantro is traditional, I know some people find it soapy-tasting. Fresh basil, particularly Thai basil if you can find it, makes an excellent substitute. You could also use a combination of cilantro and mint for a more complex herbal note.
Gluten-free option: Replace the panko breadcrumbs with gluten-free breadcrumbs or crushed rice crackers. The texture will be slightly different but still delicious. Make sure your red curry paste is also gluten-free, as some brands contain wheat.
Baked version: If you prefer not to pan-fry, you can bake these shrimp cakes. Preheat your oven to 400°F, place the patties on a parchment-lined baking sheet, brush them lightly with oil, and bake for 12-15 minutes, flipping once halfway through. They won’t be quite as crispy as pan-fried versions, but they’re still delicious and a bit lighter.
Different aioli flavors: The chili aioli is my go-to, but you can create other sauce variations. Try a lime-cilantro aioli by mixing mayo with lime juice, minced cilantro, and garlic. Or make a ginger-soy aioli with mayo, grated ginger, soy sauce, and a touch of honey.
Storage, Freezing, and Reheating
These Thai shrimp cakes are best enjoyed fresh and hot from the skillet, but they do store reasonably well if you have leftovers or want to make them ahead.
Refrigerator storage: Let cooked shrimp cakes cool completely, then store them in an airtight container in the refrigerator for up to 3 days. Place parchment paper between layers to prevent sticking. The chili aioli can be stored separately in a sealed container for up to 5 days.
Freezing cooked shrimp cakes: I find that these freeze quite well after cooking. Let them cool completely, then arrange them in a single layer on a baking sheet and freeze until solid (about 2 hours). Transfer the frozen cakes to a freezer-safe bag or container, separating layers with parchment paper. They’ll keep for up to 2 months. Thaw overnight in the refrigerator before reheating.
Freezing uncooked shrimp cakes: You can also freeze the formed patties before cooking. Place them on a parchment-lined baking sheet and freeze until solid, then transfer to a freezer bag. Cook from frozen, adding an extra 2-3 minutes to the cooking time on each side.
Reheating: For the best texture, I recommend reheating in the oven or an air fryer rather than the microwave. Preheat your oven to 350°F, place the shrimp cakes on a baking sheet, and heat for 8-10 minutes until warmed through. In an air fryer, heat at 350°F for 5-6 minutes. The microwave will work in a pinch (30-45 seconds on medium power), but the cakes will lose some of their crispiness.
Make-ahead tips: If you’re planning to serve these for a party, you can prepare the shrimp mixture up to 24 hours in advance and keep it refrigerated. Form the patties 2-4 hours before cooking and keep them chilled until you’re ready to cook. The aioli can be made up to 3 days ahead and stored in the refrigerator.
Frequently Asked Questions
Can I use cooked shrimp instead of raw shrimp?
I don’t recommend using pre-cooked shrimp for this recipe. Raw shrimp have proteins that bind together when cooked, helping the cakes hold their shape. Cooked shrimp lack this binding ability, and your cakes may fall apart during cooking.
Why are my shrimp cakes falling apart?
The most common reasons are: not chilling the patties long enough before cooking, flipping them too early before a crust forms, or over-processing the shrimp into a paste rather than keeping them coarsely chopped. Make sure to refrigerate for the full 15 minutes and let them cook undisturbed for 3-4 minutes before flipping.
Can I make these without a food processor?
Absolutely. You can chop the shrimp by hand with a sharp knife. Aim for a coarse chop with pieces about 1/4 inch in size. It takes a bit more time, but the results are just as good.
What can I serve with these besides the chili aioli?
These shrimp cakes pair well with many different sauces. Try sweet chili sauce, peanut sauce, soy-ginger dipping sauce, or even a simple squeeze of fresh lime. For a fusion approach, tartar sauce or remoulade also work surprisingly well.
How do I know when the shrimp cakes are fully cooked?
The cakes should be golden brown on both sides and firm to the touch. The internal temperature should reach 145°F (63°C). If you don’t have a thermometer, cut one open—the inside should be opaque throughout with no translucent or gray areas.
Can I make these dairy-free?
Yes! The shrimp cakes themselves are already dairy-free. For the aioli, use a dairy-free mayonnaise (most commercial mayonnaise is already dairy-free, but check the label to be sure).
What’s the best oil for frying these?
I prefer vegetable oil or canola oil because they have neutral flavors and high smoke points. Peanut oil also works well if you’re not concerned about nut allergies. Avoid olive oil, which has a lower smoke point and can impart a strong flavor.
Can I make mini shrimp cakes for bite-sized appetizers?
Definitely! Form the mixture into smaller patties (you’ll get about 20-24 mini cakes). Reduce the cooking time to about 2-3 minutes per side. These are perfect for passing at parties.
Thai Shrimp Cakes with Chili Aioli
Crispy Thai shrimp cakes made with fresh shrimp, aromatic herbs, and Thai seasonings. Served with a creamy, spicy chili aioli for a flavorful appetizer that’s perfect for parties or casual gatherings.
- Prep Time: 15 minutes
- Chilling Time: 15 minutes
- Cook Time: 8 minutes
- Total Time: 38 minutes
- Yield: 10-12 shrimp cakes (4-6 servings)
- Difficulty: Easy
- Cuisine: Thai
- Course: Appetizer
Ingredients
For the Shrimp Cakes:
- 1 lb raw shrimp (peeled and deveined)
- 2 tbsp red curry paste
- 2 green onions (chopped)
- 2 cloves garlic (minced)
- 1 tbsp fresh ginger (grated)
- 1 tbsp fish sauce
- 1 egg
- 1/3 cup panko breadcrumbs
- 2 tbsp fresh cilantro (chopped)
- 1 tbsp lime juice
- 2 tbsp vegetable oil (for cooking)
For the Chili Aioli:
- 1/2 cup mayonnaise
- 2 tbsp sweet chili sauce
- 1 tsp sriracha
- 1 tsp lime juice
Instructions
- Place the peeled and deveined shrimp in a food processor. Pulse 8-10 times until the shrimp are coarsely chopped but not pureed. You want a chunky texture with some larger pieces still visible.
- Transfer the chopped shrimp to a large mixing bowl. Add the red curry paste, chopped green onions, minced garlic, grated ginger, fish sauce, egg, panko breadcrumbs, fresh cilantro, and 1 tablespoon of lime juice. Mix thoroughly until all ingredients are well combined.
- With slightly wet hands, form the mixture into 10-12 small patties, each about 2-3 inches in diameter and 1/2 inch thick. Place the formed patties on a plate or baking sheet lined with parchment paper.
- Refrigerate the patties for 15 minutes to firm up. This helps them hold their shape during cooking.
- While the patties chill, make the chili aioli. In a small bowl, whisk together the mayonnaise, sweet chili sauce, sriracha, and 1 teaspoon of lime juice until smooth. Taste and adjust the sriracha if you prefer more heat. Set aside.
- Heat the vegetable oil in a large skillet over medium heat. Once the oil is shimmering, carefully add the shrimp cakes, working in batches if necessary to avoid crowding the pan.
- Cook the shrimp cakes for 3-4 minutes on the first side without moving them, until golden brown. Carefully flip each cake and cook for another 3-4 minutes on the second side until both sides are golden brown and the internal temperature reaches 145°F (63°C).
- Transfer the cooked shrimp cakes to a serving platter. Serve warm with the chili aioli for dipping and fresh lime wedges on the side.
Recipe Notes
- Make sure to use raw shrimp, not pre-cooked. The proteins in raw shrimp help bind the cakes together.
- Don’t over-process the shrimp. A coarse chop gives the best texture.
- The 15-minute chilling time is important for helping the patties hold their shape during cooking.
- Keep the first batch warm in a 200°F oven while cooking subsequent batches.
- For a milder version, reduce the red curry paste to 1 tablespoon.
- These can be made ahead and refrigerated for up to 4 hours before cooking, or frozen for up to 2 months.
Nutrition Information (Per Serving, Based on 6 Servings)
Estimated values:
- Calories: 245
- Carbohydrates: 9g
- Protein: 18g
- Fat: 15g
- Saturated Fat: 2g
- Fiber: 1g
- Sugar: 3g
- Sodium: 685mg
