
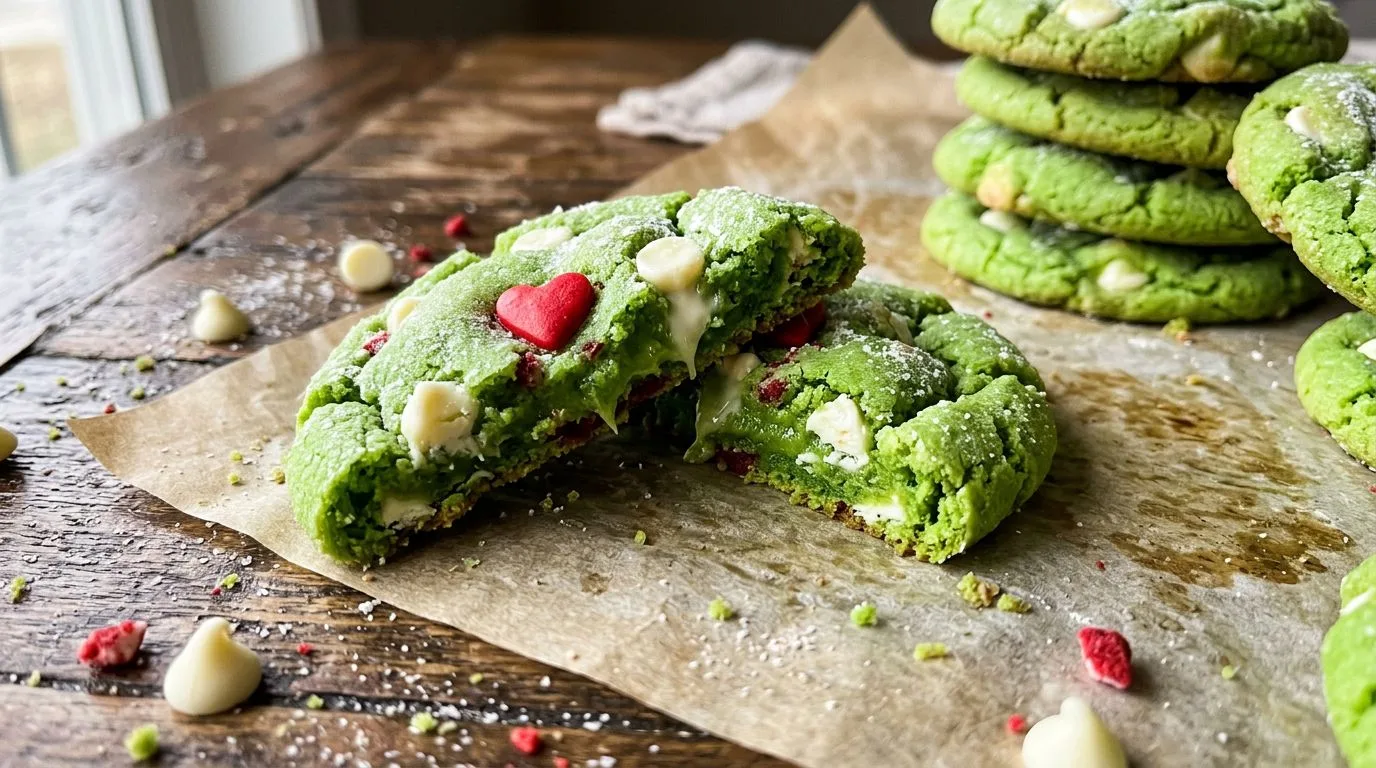
There’s something magical about Christmas cookies that combine festive colors with irresistible flavors, and these Grinch Cookies are the perfect example. With their vibrant red velvet base, creamy white chocolate chips, and playful green accents, they capture the whimsical spirit of everyone’s favorite holiday grump while delivering a soft, chewy texture that’s absolutely addictive. I love how these cookies bring together the classic red velvet flavor with a fun, kid-friendly presentation that makes them perfect for holiday parties, cookie exchanges, or simply enjoying with family while watching Christmas movies.
What makes these Grinch-inspired cookies truly special is their combination of visual appeal and incredible taste. The subtle cocoa flavor in the red velvet dough pairs beautifully with the sweet white chocolate chips, while the optional green dough accents and red heart sprinkles add that signature Grinch touch. I find that these cookies are always the first to disappear from any holiday cookie platter, and they’re surprisingly easy to make even if you’re not an experienced baker.
Why You’ll Love This Recipe
These Grinch Cookies offer everything you want in a Christmas cookie and more. The red velvet base creates a soft, tender texture that stays chewy for days, while the white chocolate chips add pockets of creamy sweetness throughout. I love how the vibrant red color makes these cookies instantly festive without requiring complicated decorating techniques.
The Grinch-inspired decoration is what really sets these cookies apart. By adding small green dough accents and red heart sprinkles, you create a playful reference to the beloved Christmas character that kids and adults alike will appreciate. I recommend making these cookies when you want something that’s both delicious and Instagram-worthy—they photograph beautifully and taste even better than they look.
Another reason I love this recipe is its flexibility. While the Grinch decoration is fun and festive, you can easily skip the green accents and simply make classic red velvet white chocolate chip cookies if you prefer. Either way, you’ll end up with cookies that have the perfect balance of cocoa richness, vanilla sweetness, and white chocolate creaminess.
Ingredients and Substitutions
The ingredient list for these Grinch Cookies is straightforward, with most items already in your pantry. The all-purpose flour provides structure, while the unsweetened cocoa powder gives that characteristic red velvet flavor and helps deepen the red color. I find that using quality cocoa powder makes a noticeable difference in the final taste.
The combination of granulated sugar and brown sugar is essential for achieving the right texture. The granulated sugar helps the cookies spread slightly and creates crisp edges, while the brown sugar adds moisture and chewiness. I recommend using light brown sugar if you have a choice, though dark brown sugar will work and add a slightly deeper molasses flavor.
Unsalted butter is my preferred choice because it allows you to control the salt level in the recipe. Make sure your butter is properly softened to room temperature—it should be soft enough to leave an indent when pressed but not melted or greasy. The eggs should also be at room temperature for better incorporation into the dough.
The white vinegar might seem like an unusual ingredient, but it’s a classic component of red velvet recipes. It reacts with the baking soda to create a tender crumb and helps activate the red color. Don’t worry—you won’t taste the vinegar in the finished cookies. If you need to substitute, you can use apple cider vinegar instead.
For the red gel food coloring, I strongly recommend using gel rather than liquid food coloring. Gel coloring is much more concentrated, so you’ll achieve a vibrant red without adding excess liquid to your dough. The green gel food coloring is optional and only needed if you want to create the Grinch-inspired green accents.
White chocolate chips are essential to this recipe, providing creamy sweetness that complements the cocoa-flavored dough. I like to use high-quality white chocolate chips for the best flavor, though standard baking chips work perfectly well. If someone in your household doesn’t enjoy white chocolate, you could substitute semi-sweet chocolate chips, though this will change the overall flavor profile and make them less Grinch-like.

How to Make This Recipe
Making these Grinch Cookies is a straightforward process that begins with proper preparation. Start by preheating your oven to 350°F and lining your baking sheets with parchment paper. The parchment paper prevents sticking and promotes even browning, which I find essential for consistent results.
In a medium bowl, whisk together the flour, cocoa powder, baking soda, and salt. Whisking ensures that the leavening agents and cocoa powder are evenly distributed throughout the flour, which prevents pockets of cocoa or uneven rising. Set this dry mixture aside while you prepare the wet ingredients.
In a large bowl, beat the softened butter with both sugars until the mixture becomes light and fluffy. This creaming process typically takes 2-3 minutes with an electric mixer and is crucial for creating the right cookie texture. The mixture should lighten in color and increase slightly in volume.
Add the eggs one at a time, beating well after each addition. Then mix in the vanilla extract, white vinegar, and red gel food coloring. I recommend adding the food coloring gradually until you achieve your desired shade of red. Mix until the color is evenly distributed throughout the wet ingredients.
Gradually add the dry ingredients to the wet mixture, mixing on low speed or stirring by hand until just combined. Be careful not to overmix at this stage, as this can lead to tough cookies. The dough should be soft, slightly sticky, and a vibrant red color. Fold in the white chocolate chips until they’re evenly distributed.
If you’re creating the Grinch-inspired decoration, remove about 1/4 cup of the red dough and place it in a small bowl. Add a small amount of green gel food coloring and knead it in until you have a bright green dough. Pinch off small pieces of green dough and gently press them onto tablespoon-sized balls of red dough, creating the appearance of the Grinch’s green fur peeking through.
Place the cookie dough balls about 2 inches apart on your prepared baking sheets. This spacing allows for slight spreading during baking without the cookies running into each other. Bake for 10-12 minutes, until the edges are set but the centers still look slightly soft and underbaked. I find that slightly underbaking these cookies keeps them soft and chewy.
As soon as the cookies come out of the oven, gently press red heart-shaped sprinkles onto the tops while they’re still warm. The warmth helps the sprinkles adhere without needing any additional frosting or glue. Let the cookies cool on the baking sheet for about 5 minutes before transferring them to a wire rack to cool completely.
Expert Tips for Best Results
Temperature control is crucial for perfect Grinch Cookies. I always bring my butter and eggs to room temperature before starting, which ensures smooth mixing and even texture. Cold ingredients can cause the butter to seize up and create a lumpy dough that doesn’t bake evenly.
When measuring flour, I recommend using the spoon-and-level method rather than scooping directly from the bag. Scooping can compact the flour and lead to dry, dense cookies. Instead, spoon the flour into your measuring cup and level it off with a knife for accurate measurement.
Don’t overbake these cookies if you want them soft and chewy. They should look slightly underdone in the center when you remove them from the oven—they’ll continue cooking on the hot baking sheet as they cool. I find that 10-11 minutes is usually perfect, though oven temperatures can vary.
For the most vibrant red color, use gel food coloring rather than liquid. Start with about 1 tablespoon and add more if needed to achieve your desired shade. Keep in mind that the color will deepen slightly as the cookies bake and the cocoa powder darkens.
If you’re making a large batch, I recommend chilling the dough between batches. Cookie dough that sits at room temperature can become too soft and spread excessively during baking. Refrigerating the dough for 15-20 minutes between batches helps maintain the perfect texture.
Serving Suggestions
These Grinch Cookies are perfect for Christmas cookie platters, where their vibrant colors and playful appearance make them stand out among more traditional offerings. I love arranging them alongside Christmas Sugar Cookie Bars with Vanilla Buttercream Frosting and Soft Gingerbread Cookies for a diverse holiday spread that offers something for everyone.
For a fun presentation at holiday parties, I like to package these cookies in clear cellophane bags tied with green ribbon. The bright red color shows beautifully through the packaging, and they make wonderful gifts for teachers, neighbors, or coworkers. You can also stack them in decorative tins with parchment paper between layers.
These cookies pair wonderfully with cold milk, hot cocoa, or even a cup of coffee. My favorite way to serve them is slightly warm from the oven, when the white chocolate chips are still melty and the cookies are at their softest. If you’re serving them at a party, consider warming them briefly in a low oven to recreate that fresh-baked experience.
For a more elaborate dessert, you can use these cookies to make ice cream sandwiches. Simply sandwich a scoop of vanilla or peppermint ice cream between two cookies and roll the edges in crushed candy canes or additional white chocolate chips. Freeze until firm for a festive frozen treat.
Variations and Substitutions
While the classic Grinch Cookie recipe is delicious as written, there are several variations you can try. For a more intense chocolate flavor, you can increase the cocoa powder to 1/3 cup, though this will make the cookies slightly darker and less vibrant red. You could also add 1/2 teaspoon of espresso powder to enhance the chocolate notes without adding coffee flavor.
If you want to make these cookies gluten-free, you can substitute a 1:1 gluten-free baking flour blend for the all-purpose flour. I recommend choosing a blend that contains xanthan gum for the best texture. The cookies may be slightly more delicate, but they’ll still taste delicious.
For a different flavor profile, you can experiment with the type of chocolate chips. Dark chocolate chips create a more sophisticated flavor, while milk chocolate chips make the cookies sweeter and more kid-friendly. You could also use a combination of white and dark chocolate chips for visual interest.
If you don’t have gel food coloring, you can use liquid food coloring, though you’ll need to use more to achieve the same vibrant color. Start with 2-3 teaspoons and add more as needed. Be aware that adding too much liquid food coloring can affect the dough consistency slightly.
For adults, you can add 1/4 teaspoon of peppermint extract along with the vanilla extract for a subtle mint flavor that pairs beautifully with the white chocolate. This creates a flavor reminiscent of candy canes without being overwhelming.
Storage, Freezing, and Reheating
Proper storage is key to keeping these Grinch Cookies soft and fresh. I recommend storing them in an airtight container at room temperature, where they’ll stay fresh for up to 5 days. Placing a slice of bread in the container helps maintain moisture and keeps the cookies from drying out—just replace the bread slice every couple of days.
These cookies freeze exceptionally well, making them perfect for advance holiday baking. To freeze baked cookies, let them cool completely, then arrange them in a single layer on a baking sheet and freeze until solid. Transfer the frozen cookies to a freezer-safe container or bag, separating layers with parchment paper. They’ll keep for up to 3 months in the freezer.
You can also freeze the cookie dough for later baking. Shape the dough into balls and freeze them on a baking sheet until solid, then transfer to a freezer bag. When you’re ready to bake, you can bake the frozen dough balls directly from the freezer—just add 1-2 minutes to the baking time. This is incredibly convenient when you want fresh-baked cookies without the prep work.
To refresh stored cookies and recreate that fresh-baked texture, I like to warm them in a 300°F oven for 3-5 minutes. This softens the cookies slightly and makes the white chocolate chips melty again. Alternatively, you can microwave individual cookies for 8-10 seconds for a quick warm-up.
Frequently Asked Questions
Can I make these cookies without food coloring?
Yes, you can absolutely make these cookies without food coloring. They’ll have a light brown color from the cocoa powder rather than the vibrant red, but they’ll taste just as delicious. The red color is purely aesthetic and doesn’t affect the flavor or texture of the cookies.
Why are my cookies spreading too much?
Excessive spreading usually indicates that the butter was too warm or the dough wasn’t chilled enough. Make sure your butter is softened but not melted, and consider chilling the dough for 15-30 minutes before baking if your kitchen is warm. Also ensure you’re measuring the flour correctly using the spoon-and-level method.
Can I use natural food coloring?
Natural food colorings can be used, though they typically produce less vibrant colors than synthetic gel colorings. Beet powder is a popular natural red coloring option, though it may give the cookies a slightly earthy undertone. You’ll need to experiment with quantities to achieve your desired color intensity.
How do I prevent the green dough from mixing into the red?
The key is to gently press the green dough pieces onto the surface of the red dough balls rather than kneading them in. Don’t worry if there’s a little mixing at the edges—this actually creates a more natural, Grinch-like appearance. Handle the dough gently and avoid overworking it.
Can I make these cookies dairy-free?
You can substitute dairy-free butter and dairy-free white chocolate chips to make these cookies dairy-free. I recommend using a high-quality dairy-free butter that’s designed for baking, as some spreads contain too much water and will affect the texture. The results should be very similar to the original recipe.
Why do my cookies turn out cakey instead of chewy?
Cakey cookies usually result from too much flour or overbaking. Make sure you’re measuring flour accurately and not packing it into the measuring cup. Also, remove the cookies from the oven when they still look slightly underdone in the center—they’ll firm up as they cool but remain chewy inside.
Grinch Cookies (Red Velvet White Chocolate Chip)
Soft, chewy red velvet cookies loaded with creamy white chocolate chips and decorated with festive Grinch-inspired colors. These vibrant Christmas cookies combine the classic red velvet flavor with playful green accents and red heart sprinkles for a fun holiday treat that’s perfect for parties and cookie exchanges.
- Prep Time: 20 minutes
- Cook Time: 12 minutes
- Total Time: 32 minutes
- Servings: 36 cookies
- Difficulty: Easy
- Cuisine: American
- Course: Dessert
Ingredients
- 2 1/2 cups all-purpose flour
- 1/4 cup unsweetened cocoa powder
- 1 tsp baking soda
- 1/2 tsp salt
- 3/4 cup unsalted butter, softened
- 1 cup granulated sugar
- 1/2 cup brown sugar
- 2 large eggs
- 2 tsp vanilla extract
- 1 tsp white vinegar
- 1 tbsp red gel food coloring
- 1/2 tsp green gel food coloring (optional, for decoration)
- 1 1/2 cups white chocolate chips
- Red heart-shaped sprinkles for decoration
Instructions
- Preheat oven to 350°F (175°C) and line baking sheets with parchment paper.
- In a medium bowl, whisk together flour, cocoa powder, baking soda, and salt. Set aside.
- In a large bowl, beat softened butter, granulated sugar, and brown sugar until light and fluffy, about 2-3 minutes.
- Add eggs, vanilla extract, white vinegar, and red gel food coloring to the butter mixture, mixing until evenly combined and the color is uniform.
- Gradually add the dry ingredients to the wet ingredients, mixing on low speed until just combined to form a soft red velvet cookie dough.
- Fold in white chocolate chips until evenly distributed throughout the dough.
- For Grinch-inspired decoration, remove about 1/4 cup of dough and tint it green with gel food coloring. Pinch off small green pieces and gently press them onto red cookie dough balls.
- Scoop tablespoon-sized portions of dough and place them 2 inches apart on prepared baking sheets.
- Bake for 10-12 minutes until edges are set and centers remain slightly soft.
- Immediately press red heart-shaped sprinkles onto warm cookies.
- Cool cookies on the baking sheet for 5 minutes before transferring to a wire rack to cool completely.
Recipe Notes
- Use gel food coloring rather than liquid for more vibrant colors without adding excess moisture to the dough.
- Cookies will look slightly underbaked when removed from the oven but will firm up as they cool while remaining soft and chewy.
- For best results, ensure butter and eggs are at room temperature before beginning.
- Cookie dough can be refrigerated for up to 3 days or frozen for up to 3 months.
- The green dough decoration is optional—cookies are delicious as classic red velvet white chocolate chip cookies without the Grinch accents.
- Store cookies in an airtight container at room temperature for up to 5 days.
Estimated Nutrition (Per Cookie)
- Calories: 145
- Carbohydrates: 20g
- Protein: 2g
- Fat: 7g
- Saturated Fat: 4g
- Fiber: 0.5g
- Sugar: 13g
- Sodium: 85mg
Nutrition information is estimated and may vary based on specific ingredients used.
