
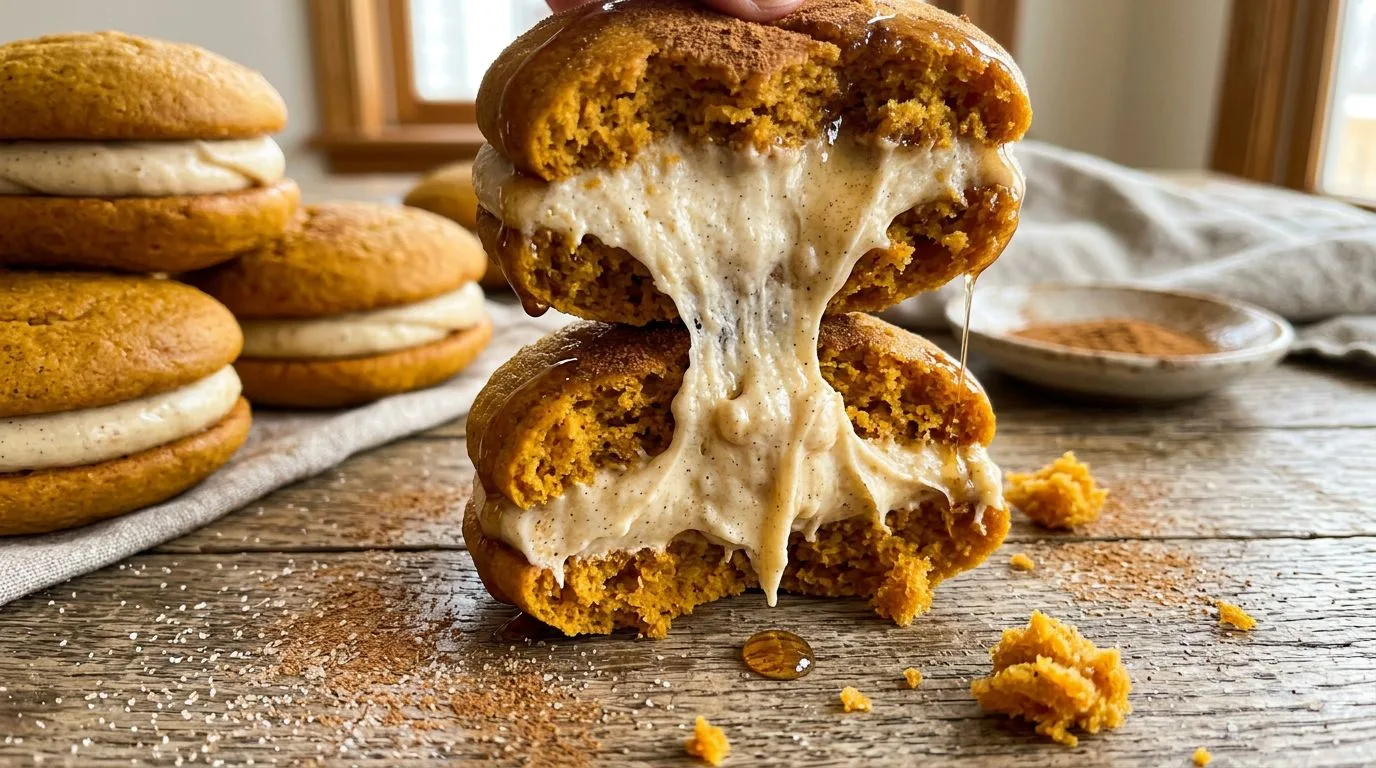
There’s something magical about biting into a soft, pillowy whoopie pie filled with creamy frosting, especially when it’s packed with warm pumpkin spice flavors. These pumpkin whoopie pies combine tender, cake-like pumpkin cookies with a luscious maple cream cheese filling that strikes the perfect balance between sweet and tangy. I love how these handheld treats capture everything wonderful about fall baking in one delightful package.
Whoopie pies have been a beloved American dessert for generations, and this pumpkin version brings seasonal flair to the classic treat. The cookies themselves are incredibly soft and fluffy, with just the right amount of pumpkin pie spice and cinnamon to make your kitchen smell absolutely heavenly while they bake. The maple cream cheese filling adds a sophisticated touch that elevates these beyond ordinary sandwich cookies, making them perfect for Thanksgiving dessert tables, autumn potlucks, or simply enjoying with a cup of coffee on a crisp fall afternoon.
What I find most appealing about these pumpkin whoopie pies is how they manage to be both impressive and approachable. They look bakery-quality but come together with straightforward techniques that any home baker can master. The combination of pumpkin puree and warm spices creates cookies that stay moist for days, while the cream cheese filling provides a luxurious contrast that makes each bite irresistible.
Why You’ll Love This Recipe
These pumpkin whoopie pies deliver on multiple fronts, making them a standout choice for fall baking. First and foremost, the texture is absolutely perfect—soft, tender cookies that practically melt in your mouth, paired with a smooth, creamy filling that doesn’t overpower the pumpkin flavor. I recommend these for anyone who loves the classic combination of pumpkin and cream cheese but wants something more fun and portable than traditional pumpkin cake.
The recipe is also wonderfully forgiving for bakers of all skill levels. Unlike some finicky desserts that require precise techniques, whoopie pies are quite straightforward. The batter comes together quickly with simple mixing methods, and the cookies bake up beautifully without requiring any special equipment or advanced skills. The filling whips together in minutes, and assembly is as simple as making a sandwich.
Another reason I love this recipe is its make-ahead friendliness. You can bake the cookies a day in advance and store them separately, then fill them closer to serving time. This flexibility makes them ideal for holiday entertaining when you’re juggling multiple dishes. The maple syrup in the filling adds a subtle sweetness that complements the pumpkin without being cloying, creating a more sophisticated flavor profile than you’d get from plain buttercream.
These whoopie pies also freeze exceptionally well, which means you can prepare a batch weeks ahead of Thanksgiving or keep some on hand for unexpected guests. They’re substantial enough to satisfy dessert cravings but not so heavy that they leave you feeling overstuffed after a big meal.
Ingredients and Substitutions
The beauty of this recipe lies in its use of pantry staples and readily available ingredients. For the cookies, you’ll need all-purpose flour as the base, which provides the perfect structure for soft, cake-like cookies. The combination of baking powder and baking soda gives these whoopie pies their characteristic lift and tender crumb. I find that using both leaveners creates the ideal texture—fluffy without being too airy.
Pumpkin pie spice and cinnamon are the flavor powerhouses here, delivering that warm, cozy taste we associate with fall. If you don’t have pumpkin pie spice on hand, you can make your own blend using cinnamon, ginger, nutmeg, and a pinch of cloves. The brown sugar adds moisture and a subtle molasses flavor that pairs beautifully with pumpkin, while unsalted butter provides richness. I recommend using softened butter rather than melted, as it incorporates better into the batter.
The pumpkin puree should be plain canned pumpkin, not pumpkin pie filling, which already contains sugar and spices. Make sure to use pure pumpkin for the best results. A large egg binds everything together, and vanilla extract rounds out the flavors with its warm, sweet notes.
For the filling, cream cheese and butter create a luxuriously smooth base. Both should be fully softened to room temperature to avoid lumps. Powdered sugar sweetens and thickens the filling, while pure maple syrup adds that distinctive maple flavor. I like to use real maple syrup rather than pancake syrup for a more authentic taste. If you need to substitute, you could use honey, though the flavor will be different.
If you’re looking for substitutions, you can replace the all-purpose flour with a 1:1 gluten-free baking blend for gluten-free whoopie pies. For a dairy-free version, use vegan butter and dairy-free cream cheese, though the texture of the filling may be slightly different. You can also reduce the sugar slightly if you prefer less sweetness, though I find the amounts in this recipe create a well-balanced dessert.

How to Make Pumpkin Whoopie Pies
Making these pumpkin whoopie pies is a straightforward process that breaks down into three main steps: preparing the cookies, making the filling, and assembling the final treats. I like to start by preheating my oven to 350°F and lining two baking sheets with parchment paper. This prevents sticking and makes cleanup much easier.
Begin by whisking together your dry ingredients—flour, baking soda, baking powder, salt, cinnamon, and pumpkin pie spice—in a medium bowl. This ensures even distribution of the leaveners and spices throughout the batter. In a separate larger bowl, whisk together the brown sugar, softened butter, pumpkin puree, egg, and vanilla extract until the mixture is smooth and well combined. The butter should be soft enough to blend easily but not melted.
Gently fold the dry ingredients into the wet ingredients, stirring just until everything is combined. Be careful not to overmix, as this can lead to tough cookies. The batter will be thick and scoopable, similar to a soft cookie dough. Using a cookie scoop or rounded tablespoon, drop portions of batter onto your prepared baking sheets, spacing them about 2 inches apart to allow for spreading.
Bake the cookies for 10 to 12 minutes, until the tops spring back when lightly touched. They should look set but still soft—don’t overbake them, or they’ll be dry rather than tender. Let the cookies cool on the baking sheets for about 5 minutes before transferring them to a wire rack to cool completely. This cooling step is crucial; if you try to fill warm cookies, the filling will melt and slide out.
While the cookies cool, prepare the maple cream cheese filling. Beat the softened cream cheese and butter together with an electric mixer until light and fluffy, about 2-3 minutes. Add the powdered sugar gradually, beating well after each addition. Finally, mix in the maple syrup and vanilla extract. The filling should be smooth, creamy, and spreadable. If it seems too soft, refrigerate it for 15-20 minutes to firm up slightly.
To assemble, pair up cookies of similar size. Spread or pipe about 2 tablespoons of filling onto the flat side of one cookie, then top with another cookie to create a sandwich. Press gently so the filling spreads to the edges without squishing out. For the best texture and flavor, refrigerate the assembled whoopie pies for at least 30 minutes before serving. This allows the filling to set and the flavors to meld together beautifully.
Expert Tips for Best Results
Getting perfect pumpkin whoopie pies comes down to a few key techniques. First, make sure all your ingredients are at the proper temperature. Room temperature butter, eggs, and cream cheese incorporate much more smoothly than cold ingredients, resulting in better texture in both the cookies and filling. I recommend taking your butter and cream cheese out of the refrigerator about an hour before you plan to bake.
When scooping the cookie batter, try to make all the portions as uniform as possible. This ensures even baking and makes it easier to pair up cookies of similar size for assembly. A cookie scoop is invaluable here—I use a medium cookie scoop (about 2 tablespoons) for consistently sized cookies. If you don’t have a scoop, use a spoon and try to eyeball similar portions.
Don’t overbake the cookies. They should look just set when you remove them from the oven, and they’ll continue to firm up as they cool. Overbaked whoopie pie cookies become dry and cake-like rather than soft and tender. I find that checking them at the 10-minute mark and watching carefully for that last minute or two prevents overbaking.
For the filling, make sure it’s the right consistency before assembling. If it’s too soft, it will squish out when you sandwich the cookies together. If it’s too stiff, it will be difficult to spread and might tear the delicate cookies. The ideal consistency is similar to frosting—spreadable but not runny. You can adjust by adding a bit more powdered sugar to thicken or a teaspoon of milk to thin.
When assembling, work with completely cooled cookies. I like to lay out all my cookies flat-side up, then match them into pairs before I start filling. This assembly-line approach is much more efficient than trying to find matching pairs as you go. If you want a professional look, use a piping bag fitted with a large round tip to pipe the filling in a spiral pattern, leaving a small border around the edge.
Serving Suggestions
These pumpkin whoopie pies are versatile treats that work beautifully in various serving contexts. I love presenting them on a tiered dessert stand for Thanksgiving or autumn gatherings, where their rustic charm and seasonal colors make them an attractive addition to any dessert table. They’re substantial enough to serve as a standalone dessert but also pair wonderfully with other fall treats.
For a cozy afternoon snack, serve these whoopie pies with hot apple cider, spiced chai tea, or a pumpkin spice latte. The warm spices in the cookies complement these beverages perfectly. If you’re hosting a fall brunch, they make an excellent sweet offering alongside coffee and fresh fruit. I find they’re especially popular with kids and adults alike, making them a crowd-pleasing choice for mixed-age gatherings.
You can also dress up these whoopie pies for special occasions. A light dusting of powdered sugar over the tops adds an elegant touch, or you could drizzle them with a simple glaze made from powdered sugar and milk. For a more indulgent presentation, roll the edges in mini chocolate chips, chopped pecans, or crushed gingersnap cookies after filling.
These treats are perfect for packaging as gifts. Wrap individual whoopie pies in cellophane bags tied with autumn-colored ribbons, or arrange several in a decorative box for a homemade gift that’s sure to impress. They travel well and maintain their quality for several days, making them ideal for bake sales, potlucks, or sending care packages to college students or distant family members.
Variations and Substitutions
While this recipe is delicious as written, there are numerous ways to customize these pumpkin whoopie pies to suit your preferences. For the cookies, you could add 1/2 cup of mini chocolate chips to the batter for a chocolate-pumpkin combination. Chopped pecans or walnuts (about 1/2 cup) would add a nice crunch and nutty flavor that complements the pumpkin beautifully.
If you want to experiment with the filling, try adding a tablespoon of bourbon or rum for an adult version with deeper flavor complexity. You could also replace the maple syrup with caramel sauce for a pumpkin-caramel combination, or use honey for a different sweetness profile. For chocolate lovers, add 2 tablespoons of cocoa powder to the filling for a chocolate cream cheese version.
For a lighter filling option, you could make a marshmallow fluff-based filling instead of cream cheese. Beat together 1 cup of marshmallow fluff, 1/2 cup softened butter, 1 cup powdered sugar, and 1 teaspoon vanilla for a sweeter, fluffier alternative. This traditional whoopie pie filling is less tangy than cream cheese but equally delicious.
You can also play with the spice blend in the cookies. Add 1/4 teaspoon of cardamom for a more complex flavor, or increase the cinnamon for a stronger cinnamon-forward taste. Some bakers like to add a tablespoon of molasses to the cookie batter for a deeper, more gingerbread-like flavor that pairs wonderfully with the maple filling.
For those following special diets, these whoopie pies can be adapted. Use a gluten-free flour blend for gluten-free cookies, or try coconut sugar in place of brown sugar for a less refined sweetener option. The recipe is quite flexible and can accommodate various dietary needs with thoughtful substitutions.
Storage, Freezing, and Reheating
Proper storage is key to maintaining the wonderful texture of these pumpkin whoopie pies. Once assembled, store them in an airtight container in the refrigerator for up to 5 days. The cream cheese filling requires refrigeration, so these aren’t suitable for leaving out at room temperature for extended periods. I recommend placing parchment paper between layers if you’re stacking them to prevent sticking.
Before serving refrigerated whoopie pies, let them sit at room temperature for about 15-20 minutes. This takes the chill off and allows the cookies to soften slightly, bringing back that perfect tender texture. They’re still delicious cold, but I find the flavors are more pronounced when they’re not ice-cold.
These whoopie pies freeze exceptionally well, making them perfect for advance preparation. You can freeze them either assembled or unassembled. For assembled whoopie pies, place them in a single layer on a baking sheet and freeze until solid (about 2 hours), then transfer to a freezer-safe container or bag, separating layers with parchment paper. They’ll keep frozen for up to 3 months.
To freeze unassembled, wrap the cooled cookies individually or stack them with parchment between layers in a freezer bag. Freeze the filling separately in an airtight container. This method gives you more flexibility—you can thaw and assemble only as many as you need. When you’re ready to serve, thaw frozen assembled whoopie pies in the refrigerator overnight, then bring to room temperature before serving.
If you’ve frozen the components separately, thaw the cookies at room temperature for about an hour and let the filling soften in the refrigerator overnight. Beat the thawed filling briefly with a mixer to restore its creamy texture before assembling. I find this method works particularly well when making large batches for events, as you can prepare everything well in advance without sacrificing quality.
Frequently Asked Questions
Can I use fresh pumpkin instead of canned?
Yes, you can use fresh pumpkin puree, but make sure it’s very smooth and not too watery. Canned pumpkin is more consistent in texture and moisture content, which is why I recommend it for baking. If using fresh, roast the pumpkin, puree it until completely smooth, and strain out excess moisture through cheesecloth if needed.
Why are my whoopie pie cookies spreading too much?
Excessive spreading usually indicates that the batter is too warm or too thin. Make sure your butter is softened but not melted, and that you’re measuring flour correctly (spoon it into the measuring cup and level off rather than scooping directly). Chilling the batter for 15-20 minutes before scooping can also help prevent spreading.
Can I make these without a mixer?
Absolutely! While a mixer makes the filling easier to prepare, you can make both the cookies and filling by hand. For the cookies, whisk the wet ingredients thoroughly, then fold in the dry ingredients with a spatula. For the filling, use a wooden spoon to beat the cream cheese and butter until smooth, then gradually incorporate the other ingredients. It will take a bit more elbow grease, but the results will be just as delicious.
How do I prevent the filling from squishing out?
Make sure your filling is the right consistency—not too soft. If it seems runny, refrigerate it for 15-20 minutes to firm up. When assembling, don’t overfill the cookies; about 2 tablespoons of filling per whoopie pie is plenty. Press gently when sandwiching the cookies together, and stop when the filling just reaches the edges. Chilling the assembled whoopie pies also helps the filling set and stay in place.
Can I make mini whoopie pies with this recipe?
Yes! Use a smaller cookie scoop (about 1 tablespoon) and reduce the baking time to 8-10 minutes. You’ll get about twice as many mini whoopie pies, which are perfect for parties or when you want smaller portions. Adjust the filling amount accordingly—about 1 tablespoon per mini whoopie pie should be sufficient.
What’s the difference between whoopie pies and sandwich cookies?
Whoopie pies are made with a cake-like batter that creates soft, tender cookies, while traditional sandwich cookies like Oreos are made with a firmer cookie dough that bakes up crisp. Whoopie pies are also typically larger and have a generous amount of creamy filling. The texture is more similar to a handheld cake than a crunchy cookie.
Can I use pumpkin pie filling instead of pumpkin puree?
I don’t recommend it. Pumpkin pie filling already contains sugar, spices, and other additives that will throw off the balance of the recipe. It’s much sweeter and has a different consistency than plain pumpkin puree. Stick with plain canned pumpkin or homemade pumpkin puree for best results.
How can I make the cookies more uniform in size?
Using a cookie scoop is the best way to ensure uniform size. A medium cookie scoop (2 tablespoons) works perfectly for standard whoopie pies. If you don’t have a scoop, you can use a measuring spoon or weigh the portions on a kitchen scale—each cookie should be about 35-40 grams of batter.
Pumpkin Whoopie Pies with Maple Cream Cheese Filling
These soft pumpkin whoopie pies feature fluffy pumpkin spice cookies sandwiched around a creamy maple cream cheese filling. Perfectly sweet and warmly spiced, these handheld fall desserts are ideal for Thanksgiving gatherings and autumn baking.
- Prep Time: 20 minutes
- Cook Time: 12 minutes
- Chilling Time: 30 minutes
- Total Time: 1 hour 2 minutes
- Yield: 12 whoopie pies
- Difficulty: Easy
- Cuisine: American
- Course: Dessert
Ingredients
For the Cookies:
- 2 cups all-purpose flour
- 1 teaspoon baking powder
- 1 teaspoon baking soda
- 1/2 teaspoon salt
- 2 teaspoons pumpkin pie spice
- 1 teaspoon cinnamon
- 1/2 cup unsalted butter, softened
- 1 cup packed brown sugar
- 1 large egg
- 1 cup pumpkin puree
- 1 teaspoon vanilla extract
For the Filling:
- 8 oz cream cheese, softened
- 1/2 cup unsalted butter, softened
- 2 cups powdered sugar
- 2 tablespoons pure maple syrup
- 1/2 teaspoon vanilla extract
Instructions
- Preheat the oven to 350°F (175°C) and line two baking sheets with parchment paper.
- In a medium bowl, whisk together the flour, baking soda, baking powder, salt, cinnamon, and pumpkin pie spice until well combined.
- In a large bowl, whisk together the brown sugar, softened butter, pumpkin puree, egg, and vanilla extract until smooth and well blended.
- Gently stir the dry ingredients into the wet ingredients, mixing just until combined. Do not overmix.
- Using a cookie scoop or rounded tablespoon, drop portions of batter onto the prepared baking sheets, spacing them about 2 inches apart.
- Bake for 10 to 12 minutes, until the tops spring back when lightly touched. The cookies should look set but still soft.
- Allow cookies to cool on the baking sheets for 5 minutes, then transfer to a wire rack to cool completely.
- While cookies cool, prepare the filling: Beat the cream cheese and butter together with an electric mixer until light and fluffy, about 2-3 minutes.
- Gradually add the powdered sugar, beating well after each addition. Mix in the maple syrup and vanilla extract until smooth and creamy.
- Once cookies are completely cool, pair them by similar size. Spread or pipe about 2 tablespoons of filling onto the flat side of one cookie, then top with another cookie to create a sandwich.
- Refrigerate the assembled whoopie pies for at least 30 minutes before serving to allow the filling to set.
Recipe Notes
- Make sure all ingredients, especially butter and cream cheese, are at room temperature for best results.
- Don’t overbake the cookies—they should be soft and tender, not cake-like.
- If the filling seems too soft, refrigerate it for 15-20 minutes before assembling.
- For a professional look, use a piping bag with a large round tip to pipe the filling.
- Store assembled whoopie pies in an airtight container in the refrigerator for up to 5 days.
- These freeze beautifully for up to 3 months. Thaw in the refrigerator overnight before serving.
- Let refrigerated whoopie pies sit at room temperature for 15-20 minutes before serving for the best texture and flavor.
Nutrition Information (per whoopie pie, estimated)
- Calories: 385
- Carbohydrates: 52g
- Protein: 4g
- Fat: 18g
- Saturated Fat: 11g
- Fiber: 1g
- Sugar: 37g
- Sodium: 280mg
Nutrition information is estimated and may vary based on specific ingredients used.
